SEAGO 4 man Offshore Liferaft – Self Service
by
Bob Wilcox – October 2015
! Items of particular note are highlighted in bold italics.
! Items peculiar to my raft are highlighted in bold red.
Introduction
After reading many postings on various fora and reading analysis of recent liferaft deployments, I decided to service my 6 year old Seago 4 man valise liferaft, thus giving it a further 3 season life at which time the gas cylinder would need certifying and refilling professionally.
This document describes the disassembly, testing and repacking of the liferaft.
Required
Tools you will need:-
- Small crosshead screwdriver,
- ½” flat screwdiver,
- scissors,
- 7mm spanner,
- 19mm spanner,
- chalk stick,
- talcum powder,
- vacuum pump (dinghy pump) with hoses/adapters,
- gaffer tape and contralube grease.
Note: A clean, dry space at least 3m x 3m. All the raft contents have a rather unpleasant odour and testing inside a house will not be appreciated by non-participants.
For the repacking:- Two strong individuals, webbing straps and stamina.
Replacement items:-
- Roof light battery or see below (4 x AAA batteries and a twin AAA battery holder).
- Optionally: Flares, seasick pills and torch.
- If needed: Fibre washer between the gas tank and raft inlet.
Disassembly
Unzip the valise and carefully feed the end of the boat tether through the valise flap ensuring that the cylinder trigger is not initiated. Separate the valise and clean it. Note carefully the position and orientation of the contents with respect to the bottom of the valise so that the Overall Plastic Bag [OPB] and the raft can be marked with chalk to help when repacking the valise. Fig 1
Untie the tether from the loop-through of the raft painter (which is inside the OPB). Unbolt the trigger clamp and completely separate the boat tether. Clean the tether as necessary. Ease the trigger nipple out of its sheath in the OPB (The sheath is quite long – careful easing is needed).
Cut across the OPB at the opposite end to the painter/nipple sheaths. This releases the vacuum in the OPB if it still exists. (The bag is 800mm wide and its material 0.22mm thick, which makes resealing quite tricky. There will be plenty of spare bag material lengthwise for repacking).
Remove the raft from the OPB. Untie the raft’s painter from the OPB (it is looped around a heat sealed eyelet that is used by the boat tether to connect the tether to the painter) and clear away the OPB. Clean the OPB as necessary.
In a clean, dry space at least 2.5m x 2.5m, partly unroll the Liferaft to reveal the gas tank. Unlace the gas tank. Fig 2

Unscrew the raft connector with a 19mm spanner to disconnect the gas tank cum fast release valve.
Securely save the fibre washer that is between the bottle and the inlet pipe.
Untie the ribbon on the thermal jacket neck and separate the tank/trigger assembly to clean conditions and protect both raft and tank open orifices. Save the ribbon securely.
Examine the gas tank. If it is in anything other than pristine condition, have it tested/refilled/replaced as necessary. (No source known)
The gas tank contains a mixture of CO2 and N2. None of the usual refillers locally could deal with this mixture. Calor didn’t recognise the tank, the dive shop only deals in breathable gases and the fire extinguisher company does CO2 only. The latter offered to ship the tank off to a specialist on a two week turnaround, if it had been needed.
Record the details stamped into the gas bottle particularly the bottle weight. This weight refers to the gas bottle only. As I did not know whether the fast relief valve could be safely removed from the gas bottle, its weight added to the total. I was assured by a fire extinguisher company that the 0.45kg additional weight I measured over the weight on the gas bottle was “about right”.
[In May 2016, PBO poster Duncan99210 reported measuring a weight of 0.526kg]
My details are as follows:-
Gas Tank Cylinder
Weights:
CO2 – 1.20kg, N2 – 0.06kg, Total – 5.45kg
198FN1964-1 CN GT 3665 03 U1
2.7 360kg 22 210 PH315BAR
π 0685 08/06
Fast Release Valve
PF1 – III, Made by Yin Jiang Life-equipment accessory.
Batch No. 08-01 Cert No. NBA 0017 0013
The raft can now be unrolled a little further. This leaves the raft in three folds over the centre line with the plain side of the raft as the top fold and the door side as the middle fold.Fig 3 & Fig 4

Completely unfold the raft. All loose articles will be lashed to the inside of the raft. Fig 5
Note carefully the position and orientation of the sundries bag. Mark the underneath of the raft with chalk marks to outline the bag’s exact position (to aid repacking). Remove the sundries bag.
Note the relative position of each item in the bag and the height of the bag. This will need to be replicated when repacking.
Remove the contents of the bag and examine each item for damage or utility (see Fig 7).
a) The torch (incandescent bulb – cheap chinese) was not working and had leaky batteries. It is somewhat Mickey Mouse in design compared to the latest LED torches in my grab bag. It was not returned to the raft.
b) The flares were out of date as expected. I decided that any replacements would be held separately in the boat’s grab bag.
c) One adapter on the pump pipe was in fragments. It was repaired/reinforced with Araldite but failed again when later inflating the raft. Luckily, if the adapter is cut off and a single turn of insulating tape is wrapped around the bare pipe, this fits the inflate holes well (and is more reliable than the correct item).
Step inside the raft and find the battery pocket for the roof light. A tethered push rod should be already inserted into battery box. Removal of the push rod should cause the roof light to illuminate. My push rod had been removed from the battery box and the battery was obviously depleted and therefore the light would have been unavailable at deployment. Fig 6
Although the battery box (part number SZ-901-1) is a sealed unit, the two pin power connector for the lead to the light is open to the elements. I decided to rework the battery box. I removed the box base and reattached it using self-tapping screws and a rubber gasket. I replaced the battery with two AAA batteries in a Maplins twin holder to produce the 3V. I also packed two spare batteries in a heat sealed bag into the battery box. [The original, now depleted, WR26500 battery delivered 2.9V for 100 hours @ 30mA. As this equates to roughly two weeks of night hours in the UK summer at sea, I was happy to use AAAs.]
The original battery was LiSO2. I guess that it was sealed in to reduce the possibility of leakage into the raft rather than protect the battery from ingress.
I could not find a replacement sealed unit available in a retail source. The battery alone is available from the ‘Small Battery Company’, LONDON.
Having rebuilt/renewed the battery, check that the light functions correctly. [Mine was working so I didn’t investigate how to replace it]. Apply contralube to the battery terminals before replacing the battery box in its pocket.
Check and replace as necessary the other internal items. Seasickness pills will be out of date. The knife and rescue quoit should be tethered. Fig 7

Inflation
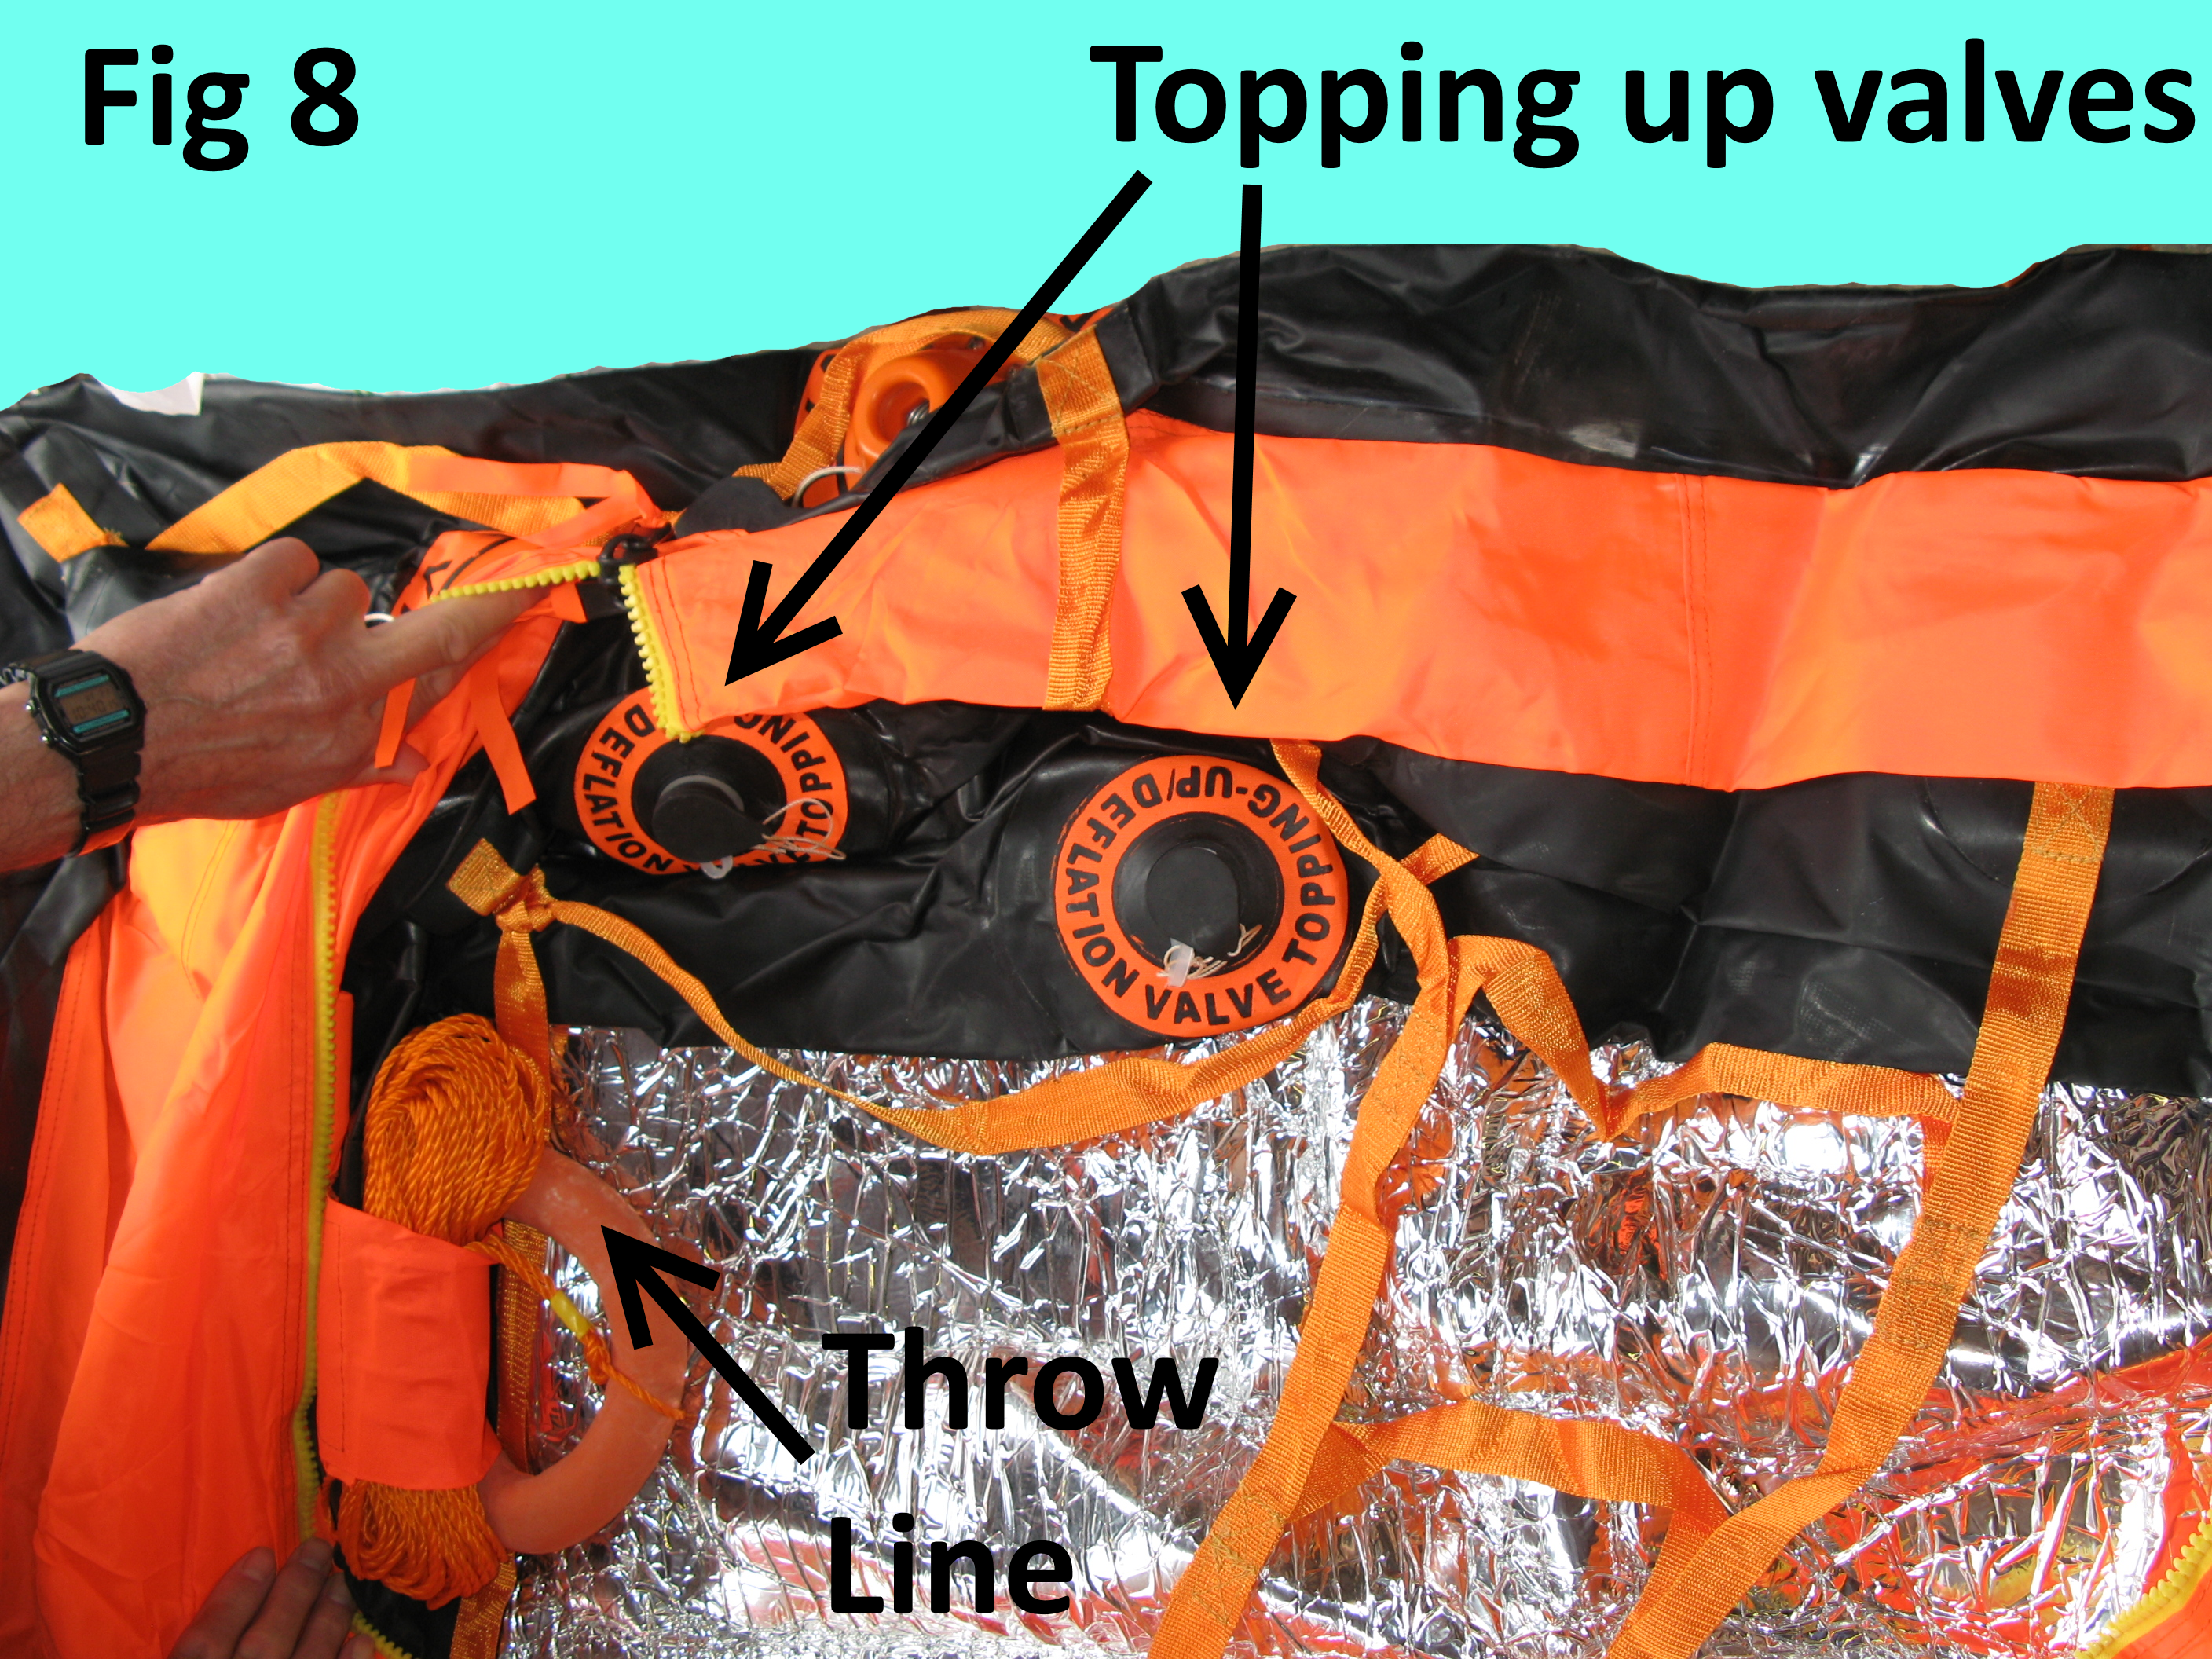
Remove the rubber bungs from the two inflation ports (14.1mm orifices). These are not one-way (non-return) valves. Before attempting inflation, I’d suggest removing and inspecting the exposed knurled nut to better understand how ‘top-up’ would work in a live situation Fig 8
The knurled nut needs to be loosened a few turns to allow inflation. Do not underestimate the amount of air needed to inflate the raft. A dinghy pump with a 15min working cycle will do a good job. I inflated the lower and upper cavities separately but allowed the upper cavity to inflate the roof.
The raft was left inflated for a week. Some sagging was evident when the temperature dropped overnight.
Deflation & Repacking
Starting with the lower cavity deflate the three cavities thoroughly using the dinghy pump. A good motorised pump is needed to fully evacuate the air and, importantly, moisture from the raft.
Reconnect the gas tank, not forgetting the fibre washer re-lace it into position. Draw the thermal insulation back over the connection. Repack the sundries bag, replicating the original arrangement of items. Reposition the sundries bag in the correct position in the raft.
Refold the raft in reverse order. Check that the sundries bag is correctly positioned to match the shape of the bottom of the valise as indicated by the chalk marks made earlier. (Voids at the bottom corners of the valise caused a failed attempt at packing). Tether the sundries bag.
Repacking was the most problematic and time consuming phase of the work.
Rethread the raft painter through its eye in the OPB and tie a bowline. Reinsert the raft into the OPB.
Sealing the open end of the OPB without a professional heat sealer is problematic. We used gaffer tape over several rolls of bag. [Using a hot iron and sandwiching the bag plastic layers between aluminium foil proved unreliable and easily unsealed]. The air can then be extracted from the OPB using the nipple at the sheath end of the OPB. Compress the rolled raft in the OPB using webbing straps with their releases uppermost so they can be released and withdrawn after the raft is reinserted in the valise.
Re-attach the boat tether to the trigger nipple and the boat tether. Feed the bitter end of the tether through the valise flap from the inside of the valise. Liberally coat the OPB and inside the valise with talcum powder. Blow away any excess powder.
Valise closure is now a matter pressing, bouncing, strapping and zipping up gradually. We found it helped to introduce the valise onto an upturned raft and get the bottom well fitted before upturning.
You may need to fail at the first attempt to realise what you have just achieved when you have a closed valise.
Other Learnings:-
It is said that using the gas tank to inflate the raft on dry land can damage the raft.
No source was found for a replacement gas tank, trigger or roof battery pack.